
Build Your Own Macebell
By Brian Ayers, CSCS
The macebell is another unique training tool that has gained popularity in the wrestling and MMA world. It has it’s origins as a training tool for warriors going into battle with heavy weapons and was used more recently by wrestlers in India where it was known as a Gadha. Much like the club and kettlebell swinging exercises, the macebell is a great tool for increasing grip strength as well as dynamic shoulder strength and stabilization. It is also great for creating a great deal of core work through exercises such as Levered presses and Macebell Lunges.
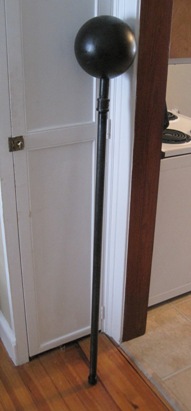
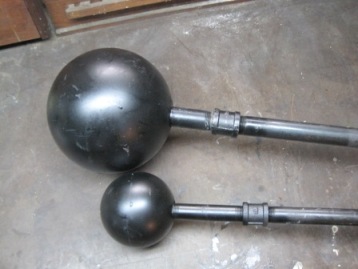
The only problem is that because it is not a mainstream training tool it can be difficult to get a hold of one. If you are able to find a website that carries them they are rather expensive. The good news is that it is relatively easy and inexpensive to make with a small amount of materials. I have seen several different homemade versions including attaching weight plates to only one end of a bar or placing a pole in a bucket of concrete and allowing it to harden. In my opinion these versions raise safety concerns. The version I use is made from a bowling ball and plumbing parts.


Here’s what you need and where to get it:
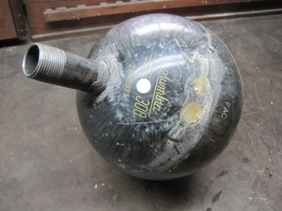
- Bowling ball (you can check local bowling alleys for balls they are getting rid of or post an add on Craig’s list.)
- Drill with a 1 3/8 inch Forsner bit (any hardware store, Home Depot or Lowes)
- 5 inch piece of 1 inch steel pipe (plumbing department of Home Depot/Lowes)
- 1inch to 1inch coupling (plumbing department of Home Depot/Lowes)
- 4 foot piece of 1 inch steel pipe (plumbing department of Home Depot/Lowes)
- 1inch steel pipe end cap (plumbing department of Home Depot/Lowes)
- JB Weld adhesive (any hardware store, Home Depot or Lowes)
- Tube of epoxy (plumbing department of Home Depot/Lowes)
- Wooden dowel the diameter of the finger holes in the bowling ball (Home Depot/Lowes)
- Can of flat black spray paint (any hardware store, Home Depot or Lowes)
The first step is to use the drill with the Forsner bit to bore out the thumb hole in the bowling ball. I use the thumb hole because it’s already the biggest diameter and it’s centered in the ball. Take your time and make sure that you stay centered when you are drilling or the ball will end up crooked on your macebell. Continue to widen the whole to about the depth of the original thumb hole then clean out all of the dust and shavings.
Next mix your JB Weld on a paper plate using a plastic spoon or knife. Spread the JB Weld on the inside of the hole as well as on the outside of the outside of one end of the 5" long piece of 1" pipe. Insert the pipe into the bowling ball twisting it as you do so that the JB Weld forms an even layer and can create a strong bond. You may need to tap the pipe in a little with a hammer or mallet but be sure to place a block of wood or a towel on the exposed end of the pipe so that you don’t damage the threads. Use a cloth or the plastic utensil to remove any excess JB Weld on the outside of the ball. While the JB Weld is setting, cut two small pieces of the wooden dowel and tap them into the remaining finger holes so that they sit just below the surface of the ball. Then take the epoxy and fill in any leftover space so that it is level with the surface of the ball. Allow the JB Weld and epoxy to dry overnight. The following day you can use some sand paper to smooth out the rough areas around the pipe and over the finger holes. Then wipe the dust off of the ball and use the spray paint to coat the entire surface of the ball. You may want to do multiple coats allowing time between for drying.
I also make a smaller version of the macebell using duck pin bowling balls and 3/4" piping. The process is pretty much the same only you will need a 1" Forsner bit to drill the hole. It is a bit harder to drill because the duck pin balls are usually more of a stone resin and there is no thumb hole so you have to find the center of the ball yourself. The only other difference between the small and the large version is that I use a 3 foot pipe length rather than the 4 foot length of the larger one. This helps to maintain the weight distribution better.
This article is property of Rugged Fitness and may not be reprinted or distributed without the written permission of the author. Requests for such permission can be sent to info@areyourugged.com. The content of this article is for informational purposes only and is not intended to replace or substitute the advice or treatment of a qualified medical professional. It is the responsibility of all users of this website to obtain proper medical clearance before engaging in an exercise program or any of the activities described in this website. Rugged Fitness is not responsible for any loss or damage suffered by the use or misuse of any information or content contained in this website.